

Yardtally is reader-supported. Some links on this page are affiliate links. As an Amazon Associate, Yardtally earns from qualifying purchases. See our Affiliate Disclosure.
Before I started researching how to fix a sinking patio, I assumed a sinking patio was a surface problem — a few pavers that needed to be reset and releveled. The more I dug into it, the more I realized that’s exactly the wrong way to think about it. A sinking patio is a base problem. The pavers themselves almost never fail. What fails is what’s underneath them — and if you don’t fix that, the same section will sink again no matter how many times you reset the stones.
This guide covers what causes patios to sink, how to diagnose which cause you’re dealing with, and how to fix it correctly so it stays level.
What’s in This Guide
- Why Patios Sink in the First Place
- How to Diagnose Your Situation
- How to Fix a Sinking Patio: Step-by-Step
- How to Prevent It From Sinking Again
- When to Call a Pro
- A Note on Concrete Patios
- FAQ
Why Patios Sink in the First Place
There are four main causes, and knowing which one you have determines whether this is a weekend DIY job or something that needs professional attention.
Poor Base Compaction
The most common cause by far. When a patio is installed, the gravel base beneath the pavers needs to be compacted in layers — typically 2 to 3 inch lifts, compacted firmly before the next layer goes down. If that step was rushed or skipped, the base slowly settles over time as the weight of the pavers compresses the loose material underneath. The result is gradual, uneven sinking that usually shows up in one or two spots first.
Water Erosion and Poor Drainage
Water is the second most common culprit. When drainage directs water toward or under the patio — a downspout discharging nearby, a yard that slopes toward the patio, or joints that have lost their sand — the base material slowly washes away. This leaves voids beneath the pavers, and the surface drops into those voids. If you notice the sinking gets worse after heavy rain, drainage is almost certainly involved.
Clay Soil Movement
Clay soils — common throughout Indiana and the Midwest — expand when wet and shrink when dry. That constant movement puts stress on the base layer underneath a patio, causing gradual settlement over time. If your yard has heavy clay soil and your patio is sinking without an obvious drainage problem, clay movement is likely contributing. Source: University of Delaware Cooperative Extension — Combating Soil Compaction
Organic Material Breaking Down
If a patio was built over an area that previously had grass, roots, or other organic material, that material breaks down slowly over the years and leaves gaps in the base. This is less common but worth considering if the patio is older and the sinking seems to be spread across a wider area rather than concentrated in one spot.
How to Diagnose Your Situation
Before you lift a single paver, spend five minutes diagnosing the scope of the problem. This determines whether you’re doing a spot repair or a full base rebuild.
Walk the entire patio and look for these signs:
- Isolated low spot — one or two pavers sitting noticeably lower than the surrounding surface. Usually a base compaction issue, DIY-repairable.
- Low spot that holds water after rain — drainage is involved. Fix the drainage first or the repair won’t last. See our guide on how to fix a muddy backyard if water pooling is a recurring issue.
- Multiple areas sinking simultaneously — the base may be failing across a wider area. Could be a full rebuild.
- Pavers that rock or feel loose underfoot — joints have lost their sand and the pavers have no lateral support.
- One side of a paver sitting higher than the other — differential settlement. Look for tree roots or a void underneath.
If the sinking is limited to one or two pavers and the rest of the surface is stable, you have a spot repair. If multiple sections are involved or the same area keeps sinking after repairs, you may have a systemic drainage or base failure that needs professional evaluation.
How to Fix a Sinking Patio: Step-by-Step
What You’ll Need
- paver puller tool set — for lifting pavers without breaking them
- rubber mallet — for tapping pavers back level
- hand tamper — for compacting the base
- Coarse gravel or crushed stone — to rebuild the base layer
- polymeric sand — for refilling joints after resetting
- landscape fabric — optional, for separating base layers
- Level — for checking that reset pavers sit flush with surrounding surface
Step 1: Find the Cause Before You Start
Look for pooling water, washed-out joints, or a failed edge nearby. If drainage is sending water under the patio, address that separately before doing any base work — otherwise you’ll be back in the same spot within a season.
Step 2: Remove the Sunken Pavers
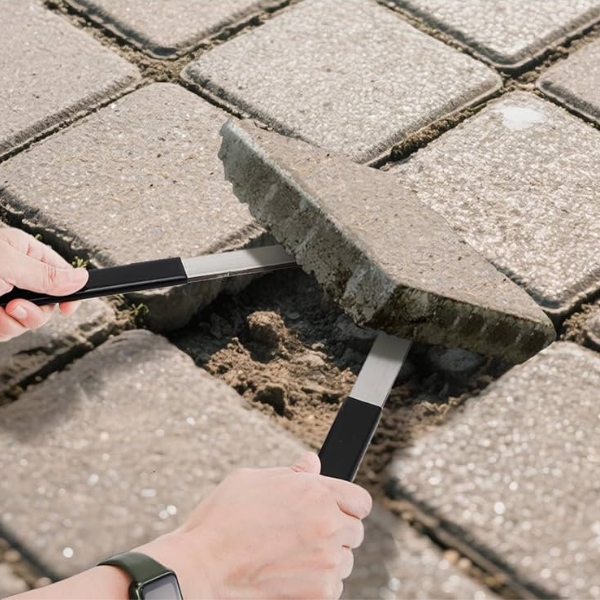
Using your paver puller tool set, lift the affected pavers and set them aside. Pull an extra foot past the sunken area in every direction — this gives you a solid reference edge for the correct grade when you relay. Clean the pavers off with a brush and set them where they won’t get damaged.
Step 3: Dig Out and Inspect the Base
Remove the bedding sand layer and inspect the gravel base underneath. Look for voids, washed-out areas, or material that’s loose and uncompacted. This is where you’ll find the actual cause — a void usually means water erosion, loose material means compaction failure.
Step 4: Rebuild the Base
Add coarse gravel back in 2 to 3 inch layers, compacting each one firmly with your hand tamper before adding the next. This is the most important step — proper compaction is what prevents the same section from sinking again. Once the gravel base is solid and at the right height, add a thin 1-inch bedding layer of concrete sand and screed it level with a slight slope away from the house for drainage.
Step 5: Reset the Pavers
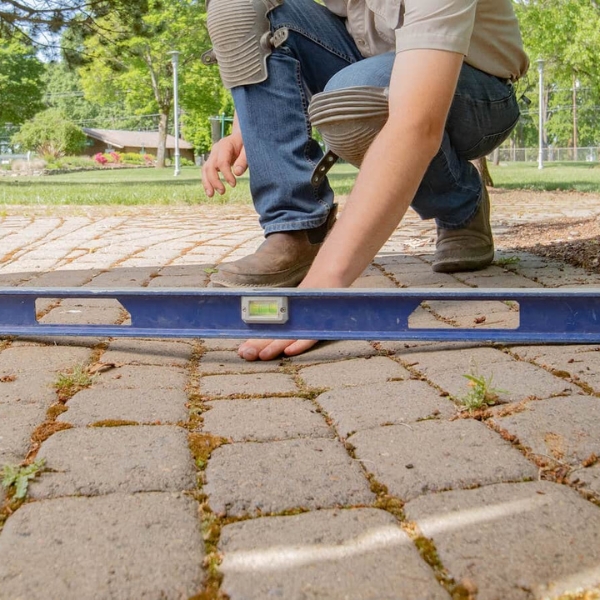
Set the pavers back in place by hand, then use your rubber mallet to tap them level with the surrounding surface. Check with a level as you go. The goal is a consistent 1 to 2 percent slope away from the house — enough to shed water without being noticeable underfoot.
Step 6: Refill the Joints
Sweep polymeric sand into the joints between pavers, working it in until the joints are full. Compact lightly with the tamper, then activate the polymeric sand with a light watering according to the package instructions. Polymeric sand hardens as it cures, which locks the pavers in place and resists washout far better than regular jointing sand.
How to Prevent It From Sinking Again
Once the repair is done, a few habits keep it level long-term:
- Maintain the slope — check that water runs off the surface rather than pooling near the center or edges
- Keep joints full — top up polymeric sand as it wears so the base stays sealed against water infiltration
- Manage runoff — keep downspouts directed away from the patio and check after heavy rain that water isn’t tracking under the edge
- Check the edges — solid edge restraints hold the whole patio together as one unit; a failed edge lets pavers migrate outward and the base erode
When to Call a Pro
Some sinking is beyond a DIY spot repair. Call a professional when:
- Multiple large sections have settled
- The same area keeps sinking after repairs
- Water is actively seeping up through the base
- You suspect tree roots or a drainage problem you can’t see from the surface
In these cases, a hardscape contractor can assess whether the base needs full excavation and rebuild, or whether a drainage correction is the real fix needed.
A Note on Concrete Patios
Everything above applies to paver patios. If you have a poured concrete slab that’s sinking, the repair approach is different — professionals typically use mudjacking or polyurethane foam injection to lift the slab by filling voids underneath it. That’s not a DIY job, and it’s a separate guide.
Frequently Asked Questions About Fixing a Sinking Patio
Why does my patio keep sinking in the same spot?
Recurring sinking in the same location almost always means the
underlying cause hasn’t been fixed — only the surface symptom. The
most common reasons for repeat sinking: water is still being directed
toward or under the patio (a downspout, a drainage slope, or joints
that keep losing sand let water erode the base repeatedly), organic
material underground is still decomposing and creating new voids,
or clay soil movement is ongoing and the base layer doesn’t have
adequate depth to absorb that movement without settling. Fix the base
cause — drainage, depth, or soil condition — before doing any surface
repair, or you’ll be back in the same spot again next season.
Can I fix a sinking patio myself?
For isolated sinking in one or two pavers where the rest of the
patio is stable — yes. Lifting the affected pavers, rebuilding the
base in compacted layers, and resetting them with polymeric sand
is a DIY-manageable weekend project. The tools required (paver
puller, hand tamper, rubber mallet, level) are inexpensive and
easy to use. Where DIY becomes less appropriate: multiple large
sections sinking simultaneously, the same area sinking repeatedly
after repairs, water actively seeping up through the base, or
suspected drainage problems you can’t see from the surface. Those
scenarios benefit from a professional assessment before any repair work.
What is the best base material for a patio that won’t sink?
Compacted crushed stone (Class II base or road base) in layers
of 2 to 3 inches each, fully compacted before the next layer goes
down. This is the standard professional base for paver patios and
the material most resistant to settling over time. The compaction
step is more important than the material itself — even the right
gravel will settle if it’s dumped in all at once and tamped once at
the end rather than compacted in lifts. Adequate base depth matters
too: minimum 4 inches of compacted gravel for a residential patio,
more in areas with heavy clay soil or significant freeze-thaw cycles.
How do I fix sinking patio pavers without lifting them?
For very minor settling — a paver that’s dropped less than a quarter
inch — sometimes tapping the high edge down with a rubber mallet
while adding fine sand to the joint can temporarily stabilize it.
But this doesn’t fix the base problem, and the same paver will
continue settling. There’s no reliable long-term fix for a sinking
paver without lifting it, inspecting the base underneath, and
addressing what failed. Skipping the lift to save time produces
a repair that fails again faster than the original installation.
How long does a patio repair last?
A repair done correctly — base rebuilt in compacted layers, pavers
reset with proper slope, polymeric sand joints — should last as long
as a new installation: 25 years or more with basic maintenance.
The key is that “done correctly” means fixing the cause, not just
the surface. A repair that resets pavers without addressing a
drainage or compaction issue may look fine for a season and fail
again within one to three winters as freeze-thaw cycles continue
working on the compromised base.
Sources & Further Reading
- University of Delaware Cooperative Extension — Combating Soil Compaction