

Yardtally is reader-supported. Some links on this page are affiliate links. As an Amazon Associate, Yardtally earns from qualifying purchases. See our Affiliate Disclosure.
Knowing how to seal windows and doors for winter starts with finding the leaks — not buying weatherstripping. I’ve done this in my own house in Greenwood and found drafts I never would have guessed existed just by walking a lit candle around the window and door frames on a cold day. Some were obvious. Some were not. The ones I missed before were costing me money every winter without me knowing it. This guide covers the full process: finding the drafts, choosing the right product for each type of gap, and applying everything so it actually holds through an Indiana winter.+
What’s in This Guide
How to Seal Windows and Doors for Winter: Step 1 — Start by Finding the Drafts
Sealing Windows for Winter
Sealing Doors for Winter
How to Tell If Your Sealing Actually Worked
What It Actually Costs to Seal Windows and Doors
Frequently Asked Questions
How to Seal Windows and Doors for Winter: Step 1 — Start by Finding the Drafts
The most common mistake people make with winter weathersealing is buying a pile of products and starting to apply them without knowing where the actual air is moving. You end up spending money on areas that aren’t a problem and missing the spots that are.

The candle or incense test
On a cold, windy day, turn off your HVAC system and close all windows and doors. Light a candle or incense stick and move it slowly along the perimeter of every exterior window and door — the frames, the sills, the top, and both sides. Watch the flame or smoke. If it flickers, bends, or gets pulled toward a gap, you’ve found a draft. Mark each one with painter’s tape so you remember where they are when you come back with materials.
What to look for beyond the obvious spots
Don’t just check the center of the window or the middle of the door frame. The most common leak points are:
- Corners of window frames where caulk has cracked or pulled away
- The bottom sill of double-hung windows where the two sashes meet
- The gap under exterior doors — even a thin gap lets in significant cold air
- Around electrical outlets and switch plates on exterior walls (these are often unsealed from inside the wall cavity)
- Where trim meets the wall around window and door casings
In Indiana and the Midwest, foundation settling from clay soil movement over time can shift door frames slightly out of square, creating gaps along one side or the top of the door that weren’t there five years ago. If a door that used to seal well now has a visible gap along one edge, settling is usually the cause — and no amount of weatherstripping will fully compensate for a frame that’s out of square without addressing the frame itself. Source: Virginia Cooperative Extension — Caulking and Weather-Stripping
Sealing Windows for Winter
The first step in knowing how to seal windows and doors for winter is understanding which product goes where… Windows have two types of gaps: stationary gaps where the frame meets the wall, and movable gaps where the sashes move. Each requires a different product.
Stationary gaps — use exterior caulk
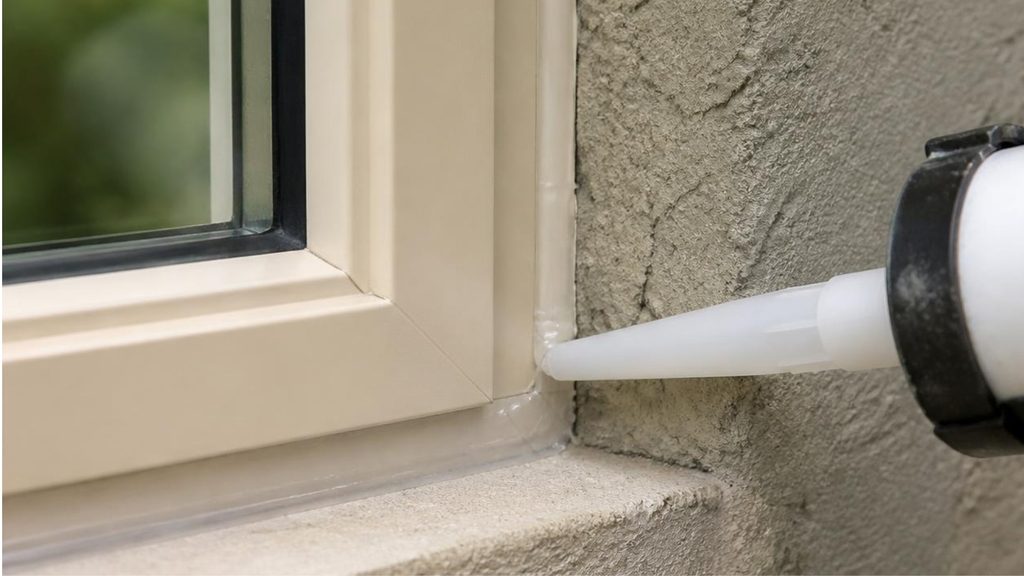
The joint where a window frame meets the exterior siding or interior trim is a stationary joint — it doesn’t move when you open the window. This gap gets sealed with caulk, not weatherstripping. Weatherstripping is only for moving parts.
For the exterior joint, use a silicone or siliconized acrylic caulk rated for exterior use. Apply a continuous bead along the full perimeter of the frame where it meets the siding. Smooth with a wet finger before it skins over. For interior trim gaps, a paintable latex caulk works fine and can be painted to match the wall.
A caulk gun and a tube of GE silicone caulk handle most residential window caulking jobs.
Movable gaps — use weatherstripping or foam tape
The gaps between the sashes on a double-hung window, or between a casement window and its frame, need weatherstripping — a compressible material that seals the gap when the window is closed but allows it to open again.
Self-adhesive foam tape is the easiest option and works well for irregular gaps. Measure the perimeter of the window opening, cut to length, and press the adhesive side firmly to the clean frame surface. Check that the window still opens and closes after application — overly thick foam can make windows difficult to operate or prevent them from closing fully.
For a more durable seal on windows you open and close regularly, EPDM rubber D-section weatherstripping compresses firmly, holds its shape through repeated use, and lasts significantly longer than foam tape. The Frost King EPDM rubber weatherseal D-section is the one I’d use on windows that see regular use.
Windows you won’t open all winter — use foam weatherstripping or rope caulk
For windows you’re planning to leave shut from November through March, rope caulk is a fast and completely reversible option. Press the putty-like rope into the gap around the sash, smooth it flat, and peel it off in spring. It leaves no residue and takes about two minutes per window. It’s not a permanent fix, but for a window in a spare bedroom that nobody opens, it’s the most practical solution available.
Sealing Doors for Winter
Doors are typically bigger air leaks than windows because the gaps are larger and the frames see more stress from repeated opening and closing. A door with a poor seal can be the single biggest source of winter heat loss in a house.
Door sweeps — seal the bottom gap
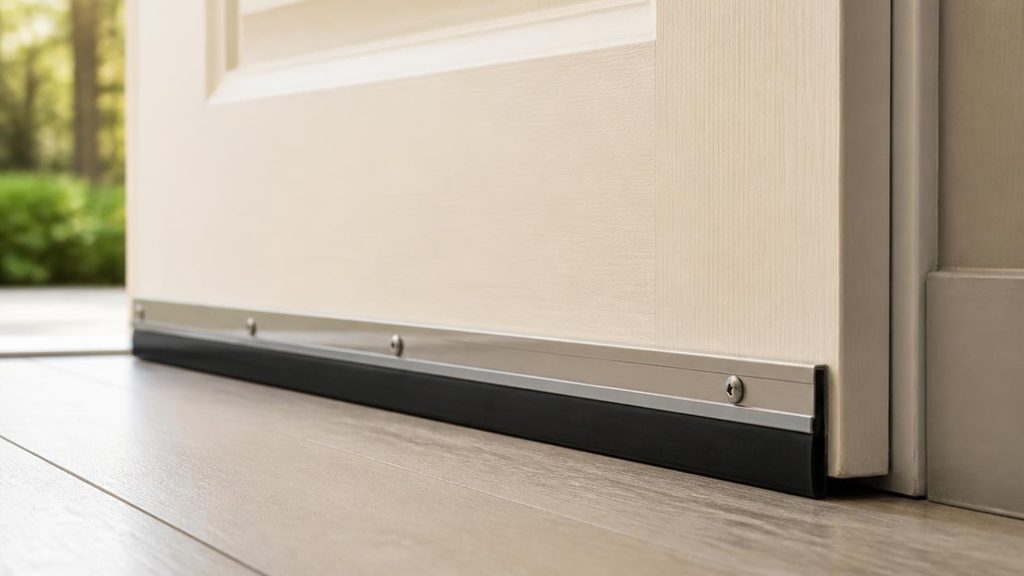
The gap under an exterior door is almost always the largest single air leak in a home. Even a gap of an eighth of an inch under a standard 36-inch door lets in a meaningful amount of cold air. A door sweep closes that gap.
There are two main types: surface-mounted sweeps that screw to the face of the door and drag along the threshold, and automatic door sweeps that retract when the door opens and drop into place when it closes. Surface-mounted sweeps are simpler to install and work fine for most residential applications. Make sure the sweep contacts the threshold across the full width of the door with light pressure — too tight and the door drags, too loose and it doesn’t seal.
Weatherstripping the door frame — sides and top
The sides and top of an exterior door frame need compression weatherstripping that creates a firm seal when the door is closed. Check the existing weatherstripping first — if it’s compressed flat, cracked, or pulling away from the frame, it needs replacement.
Remove the old weatherstripping completely, clean the surface with a damp cloth, and let it dry before applying new material. Adhesive-backed foam weatherstripping installs in minutes and works for most residential doors. Cut each piece slightly long, press it firmly to the stop molding on the frame, and test that the door closes and latches without fighting the compression.
The foam weatherstripping is what I’d use for a standard exterior door that closes and latches cleanly. If the door is slightly warped or the frame is out of square, a thicker or more compressible material may be needed to bridge the uneven gap.
Caulk around the door frame exterior
The joint where the door casing meets the exterior siding is a common draft point that weatherstripping doesn’t address. Run a bead of exterior silicone caulk along the full perimeter of the door casing where it meets the siding — top and both sides. This is a quick job that makes a noticeable difference, especially on older homes where the original caulk has cracked or pulled away. Don’t caulk the threshold — water needs to drain there.
How to Tell If Your Sealing Actually Worked
After applying weatherstripping and caulk, repeat the candle test on a cold day. Hold the flame near every spot you sealed. If it stays steady, the seal is holding. If it still flickers at a spot you treated, the seal isn’t making full contact — check that weatherstripping is making even contact across the full length of the gap, and that caulk beads are continuous without gaps or thin spots.
A secondary check: stand near a sealed window or door on a very cold day and hold your hand near the frame. You should feel no movement of air. If you feel cold air moving, there’s still a gap somewhere in the seal. Source: Virginia Cooperative Extension — Caulking and Weather-Stripping
What It Actually Costs to Seal Windows and Doors
A full weathersealing job on a standard house — caulking all windows, replacing weatherstripping on exterior doors, and adding door sweeps — runs $50 to $150 in materials depending on how many windows and doors you have and which products you choose. The U.S. Department of Energy estimates that air sealing and insulation improvements can reduce heating and cooling costs by up to 15 percent. On a typical Indiana household energy bill, that’s real money back every winter.
The job itself takes a weekend afternoon for a standard house — maybe three to four hours if you’re doing it thoroughly. No special tools required beyond a caulk gun, a utility knife, and a tape measure.
Frequently Asked Questions About How to Seal Windows and Doors for Winter
What is the best way to seal windows for winter?
It depends on the type of gap. For the joint where the window frame meets the wall — a stationary joint that doesn’t move — exterior silicone caulk is the right product. For the gap between window sashes — a movable joint — use EPDM rubber weatherstripping or self-adhesive foam tape. For windows you won’t open all winter, rope caulk pressed into the sash gap is fast, reversible, and leaves no residue when you peel it off in spring. Matching the product to the type of gap is what makes the seal hold.
How do I find drafts around windows and doors?
The candle test works well on a cold, windy day. Turn off the HVAC, close everything up, and move a lit candle slowly along the perimeter of every exterior window and door frame. If the flame flickers or bends toward the frame, you’ve found a draft. Mark each spot with painter’s tape before you go get materials. Don’t skip the corners of window frames, the bottom sill of double-hung windows, the gap under exterior doors, and the area around electrical outlets on exterior walls — those are the spots most people miss.
What’s the difference between caulk and weatherstripping?
Caulk is for stationary gaps — joints that don’t move, like where a window frame meets the wall or where door casing meets exterior siding. Weatherstripping is for movable gaps — parts that open and close, like the door itself against the frame, or window sashes against their frames. Using weatherstripping on a stationary joint or caulk on a movable joint are both mistakes — caulk on a movable joint cracks immediately from the movement, and weatherstripping on a stationary joint doesn’t create a complete seal.
How much does it cost to weatherstrip a house?
Materials for a full weathersealing job on a standard house — caulking all windows, replacing door weatherstripping, and adding door sweeps — run $50 to $150 depending on how many windows and doors you have and which products you choose. It’s one of the highest return-on-investment home maintenance projects available. The U.S. Department of Energy estimates air sealing improvements can cut heating and cooling costs by up to 15 percent, with a payback period of often one year or less.
How long does weatherstripping last?
Foam tape typically lasts two to five years before it compresses flat and loses its seal. EPDM rubber weatherstripping lasts significantly longer — seven to ten years or more with normal use. Door sweeps vary depending on traffic and material; rubber sweeps on a heavily used door may need replacement every three to five years. Check all weatherstripping annually at the start of fall — compressed, cracked, or peeling material needs replacement before winter, not after the heating bill arrives.