
Yardtally is reader-supported. Some links on this page are affiliate links. As an Amazon Associate, Yardtally earns from qualifying purchases. See our Affiliate Disclosure.
Wondering “why are my tomato leaves turning yellow?” — you’re not alone. Before you panic or start dumping fertilizer on everything, take a breath. Yellow leaves on tomatoes are common, they have a handful of well-known causes, and most of them are fixable once you know what you’re looking at. I looked into this carefully before my first real tomato season, and the key is learning to read the pattern of where and how the yellowing shows up. That tells you almost everything.
What’s in This Guide
- Start Here: Where Are the Yellow Leaves?
- Cause 1 — Nitrogen Deficiency
- Cause 2 — Magnesium Deficiency
- Cause 3 — Overwatering or Underwatering
- Cause 4 — Early Blight
- Cause 5 — Septoria Leaf Spot
- Cause 6 — Natural Aging (The One You Don’t Need to Fix)
- Quick Diagnosis Cheat Sheet
- How to Prevent Yellow Leaves on Tomatoes
- FAQ
Start Here: Where Are the Yellow Leaves?
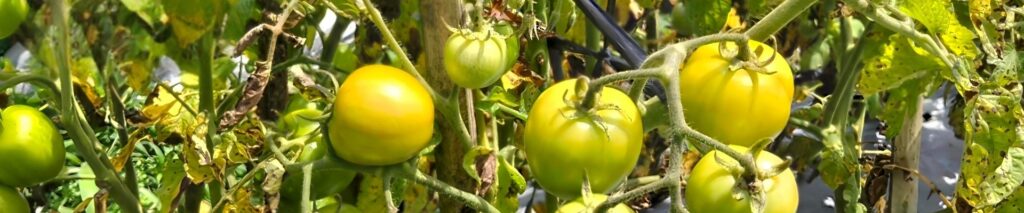
Location is the fastest diagnostic tool you have. Bottom leaves yellowing while the top growth looks healthy and green is almost always a low-urgency situation — natural aging, mild nitrogen deficiency, or a watering issue. If yellowing is spreading up the plant, or if new growth at the top is also affected, that signals something more serious. And if you see spots, lesions, or a bullseye pattern inside the yellow areas, you’re likely dealing with a fungal disease rather than a nutrient or watering problem.
Cause 1: Nitrogen Deficiency
What It Looks Like
Uniform yellowing that starts on the oldest, lowest leaves and works its way upward. The leaves don’t have spots or lesions — they just go pale yellow all over, sometimes dropping off on their own. New growth at the top of the plant stays green.
Why It Happens
Tomatoes are heavy feeders. They need significantly more nitrogen than most other vegetables — roughly twice what cucumbers need and four times what beans require. When nitrogen runs low, the plant pulls what’s available from the older leaves and redirects it to the actively growing tips and developing fruit. Those older leaves pay the price. Source: Texas A&M AgriLife Extension — Why Are My Tomato Leaves Turning Yellow
The Fix
Feed your tomatoes on a consistent schedule — every two weeks during the growing season is a good baseline. Early in the season, a nitrogen-forward fertilizer helps establish strong foliage. Once flowers appear, switch to a balanced or lower-nitrogen formula like 5-10-10 to encourage fruit development rather than leaf growth. A granular tomato fertilizer worked into the soil around the base of the plant is the most straightforward option for most home gardeners.
Cause 2: Magnesium Deficiency
What It Looks Like
Yellowing between the leaf veins on older leaves, while the veins themselves stay green. This interveinal yellowing pattern is the key tell — it distinguishes magnesium deficiency from plain nitrogen deficiency, where the whole leaf goes yellow uniformly.
The Fix
Epsom salt (magnesium sulfate) is the standard home remedy and it actually works for this specific deficiency. Dissolve one tablespoon of Epsom salt per gallon of water and apply as a foliar spray directly to the affected leaves, or water it in at the base of the plant. Don’t use Epsom salt as a general preventive — it only helps if magnesium is actually the issue.
Cause 3: Overwatering or Underwatering
What It Looks Like
Both overwatering and underwatering can cause yellowing, which makes this one tricky. Overwatered plants often have yellow leaves that feel soft and limp. The soil around the plant stays wet for extended periods and may start to smell. Underwatered plants yellow too, but the leaves will also curl, feel dry and papery, and the soil will be bone dry an inch or two down.
Why It Happens
Overwatering drowns the roots, cutting off oxygen and causing root rot — which in turn prevents the plant from absorbing nutrients even when they’re present in the soil. The result looks like a nutrient deficiency but watering more only makes it worse. Underwatering starves the plant of the water it needs to transport nutrients from soil to leaves.
The Fix
Stick your finger two inches into the soil near the base of the plant. If it’s wet, hold off on watering. If it’s dry, water deeply and thoroughly. Tomatoes need roughly one inch of water per week early in the season and up to two inches per week once they’re fruiting. Consistent, deep watering at the base of the plant is far better than frequent shallow watering. A soaker hose or drip irrigation keeps the foliage dry and delivers water right to the root zone where it’s needed.
Cause 4: Early Blight
What It Looks Like
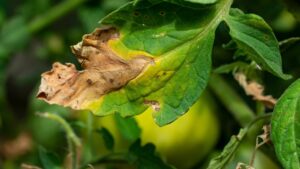
Dark brown to black spots on the lower leaves with a distinctive bullseye or concentric ring pattern inside each spot. The leaf tissue surrounding each spot turns yellow, eventually spreading until the whole leaf yellows and drops. Early blight starts at the bottom of the plant and works its way up. Source: Purdue University — Tomato Diseases
Why It Happens
Early blight is caused by the fungus Alternaria solani. It thrives in warm, humid conditions and spreads through spore splash — rain or overhead watering carries spores from infected soil or plant debris onto the lower leaves. It overwinters in old tomato debris and weeds in the nightshade family left in the garden.
The Fix
Remove and dispose of affected leaves immediately — don’t compost them. Apply a copper fungicide or chlorothalonil-based fungicide according to label directions. Going forward, water at the base of the plant rather than overhead, mulch around the base to reduce soil splash, and clean up all plant debris at the end of the season to reduce overwintering spores.
Cause 5: Septoria Leaf Spot
What It Looks Like
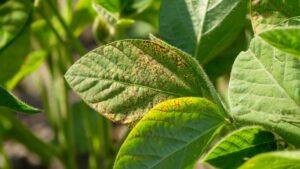
Small, circular spots — about ⅛ to ¼ inch in diameter — with a gray or white center and a dark brown margin. The key distinguishing feature: tiny black dots inside the spots, which are the fungal fruiting bodies. Surrounding leaf tissue yellows, and the leaf eventually drops. Like early blight, it starts at the bottom and works its way up.
Why It Happens
Septoria leaf spot is caused by the fungus Septoria lycopersici. Wet conditions — particularly during warm weather — trigger infection. Spores spread via splashing water and by working in the garden while plants are wet. It overwinters on infected plant debris and certain weeds.
The Fix
Same approach as early blight — remove affected leaves, apply a copper or chlorothalonil fungicide, and shift to base watering. Strip the lower 12–18 inches of leaves from the plant to reduce the risk of soil splash reaching the foliage. Don’t work around your tomato plants when the leaves are wet.
Cause 6: Natural Aging (The One You Don’t Need to Fix)
As tomato plants mature and put energy into fruit production, the lower leaves naturally yellow and drop off. This is completely normal and not a sign of disease or deficiency. If the upper growth is healthy and green, new flowers are forming, and there are no spots or lesions on the yellowing leaves, the plant is simply doing what healthy tomato plants do. Prune those lower leaves off cleanly and move on.
Quick Diagnosis Cheat Sheet
Use this to narrow it down fast:
— Uniform yellow on bottom leaves, no spots, top growth green → Nitrogen deficiency or natural aging
— Yellow between the veins on older leaves, veins stay green → Magnesium deficiency
— Soft, limp yellow leaves, soil stays wet → Overwatering
— Dry, curling yellow leaves, soil bone dry → Underwatering
— Bullseye spots surrounded by yellow, starts at bottom → Early blight
— Tiny gray-white spots with dark border and black dots inside, starts at bottom → Septoria leaf spot
How to Prevent Yellow Leaves on Tomatoes
Most of these problems are easier to prevent than to fix mid-season. A few habits make a real difference: water at the base of the plant rather than overhead; fertilize on a consistent schedule rather than sporadically; mulch around the base to retain moisture and reduce soil splash; strip the lower leaves before they touch the soil; and clean up all tomato debris at the end of the growing season. Rotate where you plant tomatoes each year — most tomato fungal diseases overwinter in the soil, and moving your plants to a new spot breaks the cycle.
Related Guides
If you’re working through garden problems this season, these might also help:
- how to start a vegetable garden from scratch
- how to prepare garden soil for planting
- how to get rid of garden pests without chemicals
Frequently Asked Questions About Yellow Tomato Leaves
Should I remove yellow leaves from my tomato plants?
Yes — for leaves that are more than 50 percent yellow or show disease
symptoms (spots, lesions, bullseye patterns). Remove them cleanly with
sharp pruners at the base of the leaf stem, not by tearing, which opens
a larger wound. Dispose of diseased leaves in the trash, not the compost
pile — fungal spores survive composting. For leaves that are just starting
to yellow with no spots, you can leave them if they’re still contributing
some photosynthesis. The rule of thumb: once a leaf is mostly yellow or
shows disease, it’s costing the plant more than it’s contributing —
remove it and let the plant redirect that energy to healthy growth and fruit.
Why are only the bottom leaves on my tomato plant turning yellow?
Bottom-leaf yellowing with healthy green growth at the top is usually
one of three things: natural aging (the plant redirecting nutrients from
older leaves to new growth and fruit — completely normal), mild nitrogen
deficiency starting at the oldest leaves, or the early stage of a fungal
disease like early blight or Septoria leaf spot that always starts at
the bottom. Check the leaves closely: uniform yellowing with no spots
suggests aging or nitrogen deficiency. Spots with a distinct pattern
— bullseye for early blight, gray-white dots for Septoria — confirm
a fungal issue. Stripping the lower 12 to 18 inches of leaves proactively
reduces soil splash and is a good habit for preventing fungal problems.
How often should I fertilize tomatoes to prevent yellow leaves?
Every two weeks during the growing season is a good baseline. Tomatoes
are heavy feeders — they need significantly more nitrogen than most other
vegetables. Early in the season, a nitrogen-forward fertilizer supports
strong leaf and stem development. Once flowers appear, switch to a balanced
or lower-nitrogen formula like 5-10-10 — high nitrogen after flowering
pushes leaf growth at the expense of fruit set. Irregular fertilizing
(heavy one week, nothing for a month) causes the boom-bust cycle that
shows up as periodic yellowing. Consistent, regular feeding is more
effective than sporadic heavy applications.
Can I save a tomato plant with yellowing leaves?
Almost always — yes. Even a plant with significant lower-leaf yellowing
is usually recoverable if you identify and address the cause. Remove
the affected leaves, identify the cause using the pattern of yellowing
(see the Quick Diagnosis Cheat Sheet above), and address it: feed for
nitrogen deficiency, apply fungicide for disease, adjust watering for
moisture problems. The damaged leaves won’t recover, but new growth
above the affected area will be healthy once the underlying cause is
resolved. The exception is a plant that’s lost most of its foliage
to disease and is declining rapidly — at that point, removal prevents
spreading the pathogen to other plants in the garden.
Is early blight the same as late blight?
[PARAGRAPH]
No — they’re caused by different organisms and have different patterns
and implications. Early blight (Alternaria solani) is the more common
of the two, starts at the bottom of the plant, creates bullseye spots,
and is manageable with copper fungicide and good garden hygiene. Late
blight (Phytophthora infestans) is more severe — it’s the same pathogen
that caused the Irish potato famine — and can destroy a plant within
days in wet conditions. Late blight spots are larger, irregular, greasy-
looking, and spread rapidly to stems and fruit. If you’re seeing fast-
moving, large irregular lesions rather than the defined bullseye spots
of early blight, late blight may be the culprit and removal of the
plant should be considered to protect others nearby.