
Yardtally is reader-supported. Some links on this page are affiliate links. As an Amazon Associate, Yardtally earns from qualifying purchases. See our Affiliate Disclosure.
Learning how to extend downspouts away from house is one of the simplest drainage fixes a homeowner can make — and in many cases it costs less than $30 and takes under an hour. Before I looked into this for my own yard, I assumed it was complicated. It’s not — extending a downspout is one of the simplest and cheapest drainage fixes a homeowner can make, and in many cases it costs less than $30 and takes under an hour. This guide covers why it matters, the four main extension options from simplest to most permanent, how to install each one, and how far the discharge point actually needs to be from the house.
What’s in This Guide
- Why Downspout Extensions Matter
- How Far Do Downspouts Need to Extend?
- 4 Ways to Extend Downspouts Away from Your House
- How to Install a Buried Downspout Extension: Step by Step
- Maintenance
- When Extensions Aren’t Enough
- FAQ
Why Downspout Extensions Matter
A single inch of rain falling on a 2,000 square foot roof produces over 1,200 gallons of water. All of that water runs into your gutters and exits through your downspouts. If those downspouts terminate 6 inches from your foundation — which is common in older homes — that’s 1,200 gallons saturating the soil directly against your house with every significant rain event.
Over time, that concentrated water causes real damage: foundation cracks from hydrostatic pressure, basement moisture and leaks, wood rot on siding and trim, soil erosion along the house, and compromised landscaping beds. Extending the downspout discharge point 6–10 feet away from the foundation dramatically reduces all of these risks at very low cost. Source: UMN Extension — Moisture in Basements: Causes and Solutions
If your yard floods after rain, downspouts dumping near the house are one of the first things to check and fix before pursuing more involved drainage solutions.
How Far Do Downspouts Need to Extend?
The minimum recommended discharge distance is 4–6 feet from the foundation. That keeps water out of the zone where it can saturate the soil directly against the house. The ideal distance is 8–10 feet, which gives water enough space to disperse into the yard before it can work its way back toward the foundation.
How far you actually need to extend depends on a few factors: if your yard slopes away from the house, 6 feet may be plenty. If your yard is flat or slopes slightly toward the house, you need more distance — or a buried pipe that carries water to a proper discharge point. If you have clay soil that drains slowly, err toward the longer end. If your home has a basement rather than a slab, the stakes are higher and more distance is worth it.
4 Ways to Extend Downspouts Away from Your House
Option 1 — Flexible Accordion Extension (Easiest, ~$5–$15)
A flexible plastic accordion-style downspout extension snaps onto the bottom elbow of your existing downspout and extends the discharge point 4–6 feet away. It takes about five minutes to install, requires no tools, and can be repositioned or removed easily. This is the right starting point for most homeowners — cheap, fast, and effective for moderate drainage situations.
The limitation: accordion extensions sit on the surface and can be a tripping hazard along walkways. They also tend to shift over time as the ground freezes and thaws, and lawn mowers can clip them. For high-traffic areas or a cleaner look, one of the buried options below is a better long-term choice.
Option 2 — Rigid Aluminum or PVC Extension (Simple, ~$10–$30)
A rigid extension using matching aluminum downspout material or PVC pipe is a step up from accordion-style — it looks cleaner, holds its shape, and doesn’t shift over time. You’ll need to measure your existing downspout opening (typically 2×3 or 3×4 inches for residential aluminum) and match the material. Attach with sheet metal screws and seal joints with gutter sealant. A splash block at the discharge end disperses water and prevents erosion at the outlet.
This option works well where the extension runs along the side of the house or a fence line and appearance matters. It’s still a surface-level solution, so the same tripping hazard and mowing considerations apply.
Option 3 — Roll-Out Sleeve (Compact Storage, ~$15–$25)
A roll-out sleeve sits flat and coiled at the base of the downspout when dry. When rain comes and water flows through it, it unrolls and extends 4–8 feet, discharging water well away from the house. When the rain stops and it dries out, it rolls back up on its own.
This option is useful for areas where a permanent extension would be in the way — along a walkway or patio edge, under a deck, or anywhere a fixed extension creates a hazard. The tradeoff is that roll-out sleeves can get pinched, stepped on, or tangled over time.
Option 4 — Buried Underground Pipe with Pop-Up Emitter (Most Permanent, ~$50–$150 DIY)
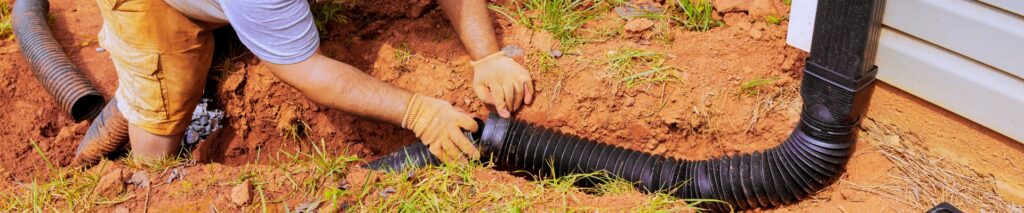
Burying a non-perforated drain pipe from the downspout to a discharge point in the yard is the cleanest, most permanent solution. The pipe is invisible, can’t be tripped on, doesn’t interfere with mowing, and carries water completely away from the house to wherever you want it to discharge. A pop-up emitter at the far end opens under water pressure to discharge flow and closes when dry — keeping pests and debris out of the pipe.
This is the right choice for high-traffic areas, wherever aesthetics matter, or any situation where a surface extension keeps getting moved, damaged, or mowed over. It requires a few hours of work and a small trench but is completely DIY-able for most homeowners.
How to Install a Buried Downspout Extension: Step by Step
What You’ll Need
Non-perforated 4-inch corrugated drain pipe (not perforated — you want water to travel the full length, not seep into the soil mid-run), a downspout adapter fitting, a 90-degree elbow if needed, a pop-up emitter for the discharge end, a flat spade or trenching tool, and basic hand tools.
Important: use non-perforated pipe for downspout extensions. Perforated pipe is designed for French drains where you want water to seep into the surrounding soil — the opposite of what you’re doing here.
Non-perforated 4-inch corrugated drain pipe is available at Home Depot and Lowe’s in 10- and 25-foot lengths — buy the length you need in store rather than ordering online.
Step 1 — Plan Your Route and Discharge Point
Decide where the pipe will exit. Common discharge options: a lower corner of the yard, a garden bed away from the house, the street curb, or a dry well. The discharge point must be lower than the downspout outlet so gravity moves the water. Plan a route that avoids tree roots, utility lines, and hardscape wherever possible. Call 811 before digging if the trench will be deeper than 6 inches.
Step 2 — Dig the Trench
Dig a trench 6–8 inches deep along your planned route, sloping slightly downhill from the downspout toward the discharge point. The slope doesn’t need to be dramatic — 1 inch of drop per 10 feet is enough. A flat spade works fine for most residential installations. For runs longer than 30 feet, a trenching spade or rented trencher makes the work significantly faster.
Step 3 — Connect the Pipe to the Downspout
Disconnect or remove the existing surface extension. Fit the downspout adapter to the bottom elbow of the downspout. Use a 90-degree elbow if needed to transition from vertical to horizontal. Connect the non-perforated pipe to the adapter and run it through the trench toward the discharge point. Secure connections with sheet metal screws or appropriate pipe clamps.
Step 4 — Install the Pop-Up Emitter
At the far end of the pipe, connect the pop-up emitter so it sits flush with or just above ground level. The emitter cap opens when water pressure builds during rain and closes when flow stops, keeping the pipe clear of debris and critters between rain events. Make sure the emitter is positioned so it discharges onto a stable surface — gravel, grass, or a splash pad — to prevent erosion at the outlet.
Step 5 — Backfill and Restore the Surface
Fill the trench with the excavated soil, tamping lightly as you go. Top with a thin layer of topsoil and reseed if the trench crossed a lawn area. The only visible sign of the system should be the pop-up emitter cap at the discharge end.
Step 6 — Test the System
Run a garden hose into the top of the downspout and watch for discharge at the emitter end. Water should flow out within a minute or two. If nothing appears, check for a kinked pipe or a section that’s sloping the wrong direction.
Maintenance
Surface extensions — check annually that they’re still attached securely and positioned correctly. Accordion extensions shift over winter; re-seat them each spring.
Buried extensions — flush annually by running a hose through the system. Check the pop-up emitter to make sure it opens and closes freely. If flow is slow or stopped, a clog at the emitter or a leaf/debris blockage in the pipe is the likely cause. Clear gutters regularly to reduce debris entering the downspout system.
If your buried extension stops draining and flushing doesn’t clear it, a plumber’s auger run through the pipe from the downspout end will clear most blockages.
When Extensions Aren’t Enough
If you’ve extended all your downspouts to 8–10 feet and water is still pooling against the house or in the yard, the problem is bigger than downspout placement. The next things to investigate: yard grading (the ground may be sloping toward the house), compacted soil, or a low spot that’s collecting water from multiple directions. Our guide on how to grade a yard for drainage covers how to diagnose and fix grading problems.
For persistent pooling away from the house that downspout extensions alone can’t reach, a French drain may be the right next step. Our guide on how to install a French drain covers when that’s the right fix and how to do it.
Frequently Asked Questions About Extending Downspouts
How far should a downspout extend from the house?
The minimum recommended distance is 4 to 6 feet from the foundation —
far enough to keep water out of the zone where it saturates soil directly
against the house. The ideal distance is 8 to 10 feet, which gives water
enough room to disperse into the yard before it can work back toward
the foundation. If your yard is flat or slopes slightly toward the house,
err toward the longer end or use a buried pipe that carries water to a
proper discharge point in the yard rather than relying on surface
dispersion.
What is the best type of downspout extension?
For permanence and appearance, a buried non-perforated pipe with a pop-up
emitter is the best option — completely invisible, can’t be tripped on,
and carries water all the way to a proper discharge point. For a quick,
cheap fix that still works, a flexible accordion extension moves the
discharge point 4 to 6 feet away for $10 to $15 and takes five minutes
to install. For medium-term solutions in areas where aesthetics matter,
rigid aluminum or PVC pipe in a matching size runs cleaner than accordion
and holds its position better. Choose based on your situation — the right
answer balances effectiveness, budget, and how permanent the solution
needs to be.
Can I bury a downspout extension myself?
Yes — burying a downspout extension is a straightforward DIY project for
most homeowners. You need non-perforated 4-inch corrugated drain pipe,
a downspout adapter fitting, a pop-up emitter for the discharge end, and
a flat spade for the trench. The trench needs to be 6 to 8 inches deep
and slope slightly downhill from the downspout to the discharge point —
at least 1 inch of drop per 10 feet. The most common mistake is using
perforated pipe (designed for French drains where you want water to seep
into the soil) instead of non-perforated pipe (which carries water the
full length to the discharge point). Call 811 before digging if the
trench will be deeper than 6 inches.
Will extending my downspouts fix my flooding yard?
It depends on the cause of the flooding. If your downspouts are terminating
close to the foundation and that’s where the water is pooling, extending
them is the fix. For many homeowners, it resolves the problem completely.
If the flooding is happening in an area of the yard well away from the
house, or if water is coming from a neighboring property or runoff from
a slope, downspout extensions won’t address those sources. Downspout
extension is always the first thing to try — it’s cheap and fast — but
persistent flooding that doesn’t respond to it needs a more thorough
drainage diagnosis.
Do downspout extensions need maintenance?
Surface extensions need to be re-seated annually — they shift over winter
freeze-thaw cycles and can be knocked out of position by lawn mowers or
foot traffic. Check them each spring and reconnect any that have separated
from the downspout. Buried extensions need an annual flush — run a hose
through the system and check that the pop-up emitter opens and closes
freely. If flow is slow, a clog at the emitter or debris in the pipe is
the likely cause. Clean gutters regularly to reduce the amount of debris
entering the downspout system in the first place.